Making an elegant underwear dryer in bamboo. Simple tools and easy

This multifunction bamboo dryer can be used for hanging small clothes, socks, and underwear. It has 16 clamps, but we usually put much more on it by attaching some clothes directly to the bamboo sticks. For just a few hours of work to build, we have already used it several times a week for more than two years!
It does not require more technical skills than the bamboo trivet. In essence, it is a kind of big trivet! I also used complementary store-bought material such as clamps, strings, and a hook. As well as for the bamboo trivet, you can make it entirely with manual tools and use bamboo dowels to join the pieces together.
- Level: fairly easy
- Building time: a few hours to half a day (depending on your level of perfectionism!)
- Size: 50 x 50 cm (about 20 x 20 in)
This post is part of my bamboo craft project. If you are looking for something a little bit easier, check out the tutorial for the bamboo trivet. If you want something a little bit more complex, you can have a look at my bamboo speaker for smartphone!
Table of content
Material and tools needed
Building material
- 16 metallic clamps with holes to be able to hang strings on them
- 1 string of about 3.2 m long (125 in) and 0.5 cm thick (0.2 in)
- 1 metallic hook
- a bamboo pole of a least 50 cm long (about 20 in), 6-8 cm in diameter (2.4-3 in), and 0.7-0.8 cm thick (about 0.3 in).
Such a thickness for the bamboo pole provides enough strength to the structure. If you don’t have access to such a pole, no worries, you may have to adapt the size, and you will just obtain a different dryer!
You can use a fresh or dry bamboo pole. I already tried, and both are fine. It can be easier to work with fresh bamboo, as it is tender and more flexible, but there is a risk that some cracks appear when it dries later. On the contrary, dry bamboo can be tougher and more brittle, so some craftsmen will soak the dry bamboo in water for a day before working on it.
Tools
- saw
- matchet or knife
- tape measure
- cutter and/or sandpaper
- pencil
- scissors
- multi-grip pliers
- manual or electrical driller
- wood support to immobilize your bamboo when working on it
- safety gloves
Wear gloves for safety!
It is always a good idea to wear gloves if you are a beginner, at least one glove for the more vulnerable hand that is holding the bamboo when you use a tool.
Decide on the size of your future laundry dryer
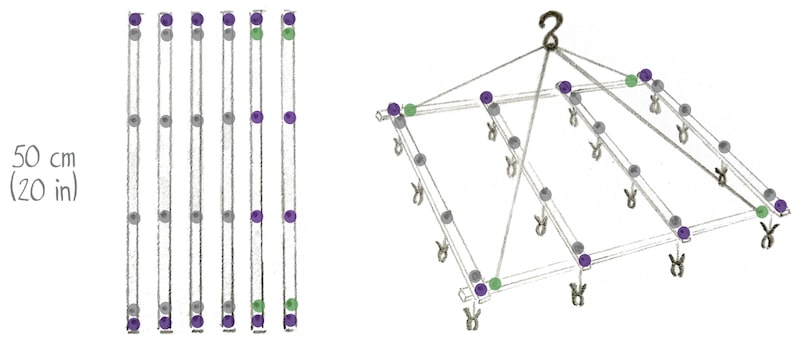
Here I propose a square underwear dryer of 50 x 50 cm (about 20 x 20 in), made of 6 slats of about 1.5 cm wide (0.6 in).

Depending on your needs and the bamboo pole you have, you can adjust the size of this dryer. The slats which will make the structure are from a single cylindrical portion of your pole.
Saw a cylinder of bamboo
First, you need to saw a bamboo cylinder of 50 cm long (20 in) or your custom length.
Try to saw a clear cut perpendicular to the bamboo axis to obtain slats of the same length in the next step, as this will save you some correcting work later.
Split the cylinder into 6 flat slats
Use a tape measure and a pencil to mark the limits of the 1.5 cm wide slats (0.6 in) on your bamboo cylinder. Split the cylinder on the marks to create your raw slats.

You can also try to split your cylinder into two halves and then each half in 3 slats, without measuring and marking. It depends on the precision you want to achieve for your final craft.
See how experts split bamboo into flat slats.
With a bamboo cylinder of 6-8 cm in diameter (2.4-3 in), you will obtain more slats than necessary. They may be additional ones in case one of them breaks in the building process, or they can be used to create dowels.
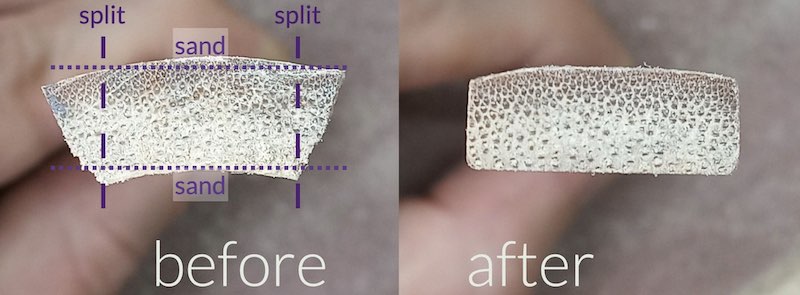
The last step is to correct the edges of the slats that we want to be closer to 90° angles. The easiest way is to split again using your matchet or knife, and then sand using sandpaper or a cutter (next step). You can simplify or even skip this step if you prefer, as it is more a matter of style for your final craft than a matter of strength.

Sand the slats
Here we want to flatten the bottom side of the slats that is concave, the top side which is convex, and the edges in case the splitting was not smooth enough. For the bottom and the top sides, flat surfaces will help to avoid splitting the slats when drilling and will make the joints tighter and more stable. For the edges, it is more a matter of style.
You can use 2 different techniques to sand. Using sandpaper will make your work more precise, but it can be more challenging to do with long slats like these. Otherwise, you can use your knife, matchet, or a cutter to smoothen by scrapping the slats. It is less precise and may require a little bit more practice, but it can be quicker and less demanding while creating a more rustic style to your underwear dryer!
Drill the slats
When drilling, there is always a chance of breaking a slat if we apply too much pressure. But the risk is reduced when the bottom of the slat is flat. You can use a manual or electrical driller. Here I used an electrical driller with a drill bit of 6 mm in diameter (0.25 in).
All slats need one hole  at each end, for joining them together with dowels. It is better not to drill these holes too close to the ends to reduce the risk of splitting. 1-1.5 cm from the edge (0.4-0.6 in) should be fine.
Four of the slats need 4 additional holes  evenly distributed along their length, for attaching the clamps. These holes are separated from one another by about 15-16 cm (6 in).
Finally, each of the two slats supporting the whole structure also need 4 additional holes: 2 holes in the middle for joining the slats together, and 2 holes  for attaching the strings linked to the hook.
If you want to make sure your dryer will always keep its shape, you may need two holes at each angle of your dryer to act as a cross-bracing. In this case, however, you may need to use a thinner drill bit to fit two holes while avoiding splitting the slats. In my case, I only used one dowel for each joint. Our dryer is hence a little bit flexible, but it turned out to be totally fine.
Make the dowels
Use one of the remaining slats to create the dowels for the 8 joints.
Using your matchet or knife, split the slat into sticks the diameter of the holes you drilled, that is, 6 mm in diameter in my case (0.25 in).

Dowels can be very slightly wider than the holes so that they will maintain the two slats well. For precise work, it can be more efficient to use a small knife or a cutter to prepare the dowels, but with extra care to make sure not to cut your fingers!
Join the bamboo pieces together
Gently insert a dowel into a hole to join two pieces. You can use the blade of your matchet as a light hammer. If the dowel is not perfectly round or not wide enough, which is quite common, you can use some left over fibers to fill the gaps.
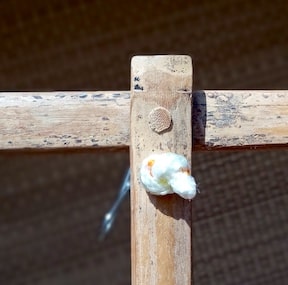
When the dowel transpierces the 2 layers of slats, cut the surplus of the dowel using your saw or another tool, such as shears or a cutter if it is handier. Then repeat the same process for all the holes one after the other. You can see in the picture that I left the dowels slightly protrude, which gives a nice rustic style.
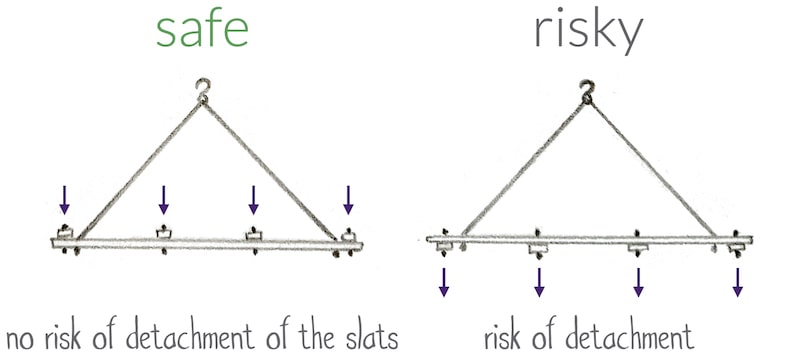
Make sure the two slats supporting the whole structure are below the ones supporting the clamps. This will avoid the potential risk of detachment of the slats under the weight of the clothes, as dowels alone may not be strong enough if the weight is too high.
Hang the clamps to the structure using the string
In order to link the clamps to the bamboo frame, you can hang the clamps to pieces of string, and then hang the strings to the slats through the holes you already drilled.
I chose a length of 5 cm (2 in) between the clamps and their respective bamboo slat.

Then you can attach the strings which hold the hole structure, like a pyramid. In our case, there are 40 cm (16 in) between the slats and the hook.
Finally, you can simply attach your hook to the top of this pyramid. In our case, I distorted one tip of the hook into a loop using multi-grip pliers.

And that’s it, you did it!
Sustainability: after 2 years
Now, what about the sustainability of our laundry dryer?
Well, we have been using it several times a week for more 2 years now. I used an untreated bamboo that I harvested myself, and the dryer has already spent hundreds of hours under the direct sun. Yet, it is still in good enough conditions to help us every week with our laundry!
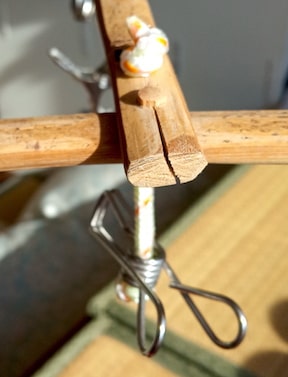
An interesting point is that one slat split during the process of inserting a dowel. I just decided to leave it this way to see how it would evolve.
It turns out that, despite two years of frequent use even under direct sun exposition, the whole structure is still quite strong. Hence, even if cracks appear on a bamboo craft during the building process or later, it may still be used without any problem.
Disclaimer
I am doing my best to share clear, useful, and quality research. However, I disclaim any liability regarding the way the content that I share may be interpreted or used, and regarding the consequences of its use.
Lénaïc Pardon
I am a kind of researcher-explorer. I am French, introverted, and hypersensitive. I value a lot freedom, creativity, and altruism. I am curious about almost anything, but I do have a preference for topics around simple living: permaculture, nature, craftsmanship, autonomy, philosophy, the mysteries of life… More about me and my work >