How and when to plant a mini vegetable forest on the balcony, take care of it and multiply the seedlings?
I originally published this article in French on the webzine Vibre Magazine. It is the 2nd episode of a series of 4 articles on planting a tiny forest garden on the balcony.
In the previous article, I present four principles that characterize natural forests. Then I suggested a combination of six plants to start experimenting with the concept of an edible forest, on a very small scale, on your balcony.
In this article, we put on our gloves and get to work!
Where to find these plants? When to plant them? How to take care of them? And how to multiply them to offer them around us?
In this series of articles, my objective is to invite you to dare to experiment by yourself. I go into detail, I propose clear directions, but then it’s up to you to adjust, to try! Because each balcony, each microclimate, each gardener is unique, so each mini-forest is different.
Table of Content
Where to find the seedlings?
If you’re a beginner gardener, it’s easiest to buy plants that are already in pots rather than seeds that you have to germinate yourself. There are countless small challenges that come along the way for novice gardeners, and I think it’s most effective to get right to the point at first.
Ideally, you would get plants from a neighbor or a friend, who will even be able to tell you exactly how to handle their plants.
If you don’t have this option, plants can easily be found in garden stores (e.g. cherry tomatoes, basil, kale). You can also simply replant ginger or sweet potatoes purchased in organic stores.
Perennial vegetables are rarely found in garden stores, but you can find them in the nurseries of certain food forests. And there are online stores that specialize in perennial and rare vegetables, like these, in the US, and in the UK.
And if you want to try sowing, we can easily find seeds in garden stores and in some organic stores.
If you can’t find the plants I suggest, no problem! An infinite number of combinations are possible, all of which allow you to learn a lot about nature.
You could replace ginger with turmeric. You could replace the cherry tomato with chili pepper. You could replace basil with mint. You could replace the perennial leeks with the surprising tree onion. Etc.
Visit a garden center, visit an online store, and choose beautiful plants that motivate you. The two main ideas for an edible mini-forest that mimics nature are to favor perennial or easily propagated plants and to vary the shapes and families of plants.
When to plant our mini vegetable forest?
In general, spring is the ideal time for planting. Around March-April, when the cold weather becomes less severe and nature wakes up.
In Mediterranean climates, you can even start experimenting in January or February! And if you start late, it is always possible to plant during the summer, being careful to water well. Your production will be smaller, but you’ll learn a lot for better success the following year.
Kale and perpetual leek (and all other cabbages and leeks) are great in cold climates because they are frost resistant. They can be planted in the fall as well as in the spring.
Hardy ginger rhizome and sweet potato root are frost resistant when well protected in the soil. This winter in Burgundy, I tried leaving my ginger and sweet potatoes directly in the ground. I’m waiting to see what will happen… But to start the mini-forest without taking risks, it’s better to plant them in spring after the frosts.
Tomatoes and basil are delicate plants that are not frost resistant. You can keep the plants indoors before transplanting them into the planter around March or April, when frosts are less likely.
When you want to try to extend the growing period of the plants in cold climates, you can cover the tray with a transparent plastic sheet which will act as a greenhouse. In this case, you can try everything from February to March, including ginger, sweet potatoes, tomatoes, and basil.
One of the advantages of growing on your balcony is that you are always very close to your mini forest. At a glance, we can check the temperature outside and the mood of our little plants. Are they cold? Should we cover them with a plastic sheet? Or even bring the tray inside for the night?
Another advantage is that a balcony has its own microclimate. The walls protect it from the wind and reflect the sun’s heat at night. Often, while it is freezing in the street, the temperature stays above zero on the balcony, which limits the chances of losing plants, and encourages you to try more exotic plants!
How to take care of the plants?
1. Sweet potato
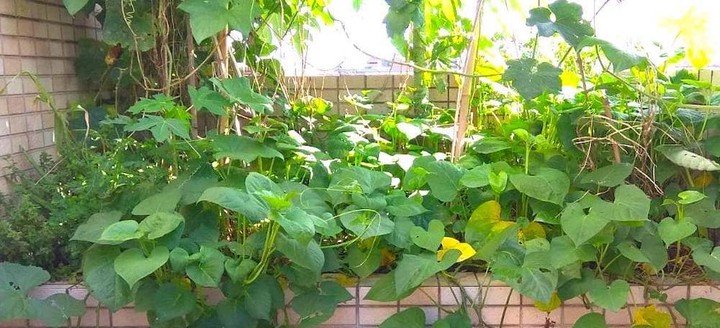
As the soil gradually warms up, small shoots develop on the sweet potatoes and emerge from the soil. In general, sweet potato stems tend to crawl. They then catch the sunlight well beyond the planter itself, and gradually colonize your balcony! You can try mounting them on a structure to create a shady plant cocoon. Meanwhile, new small sweet potatoes are growing in the soil.
When you want to prune a bit, don’t throw away the leaves or stems. They can be eaten like spinach. You can leave the sweet potatoes in the ground and harvest only the stems, which will grow back year after year. Or you can harvest the roots from time to time, in the fall or winter.
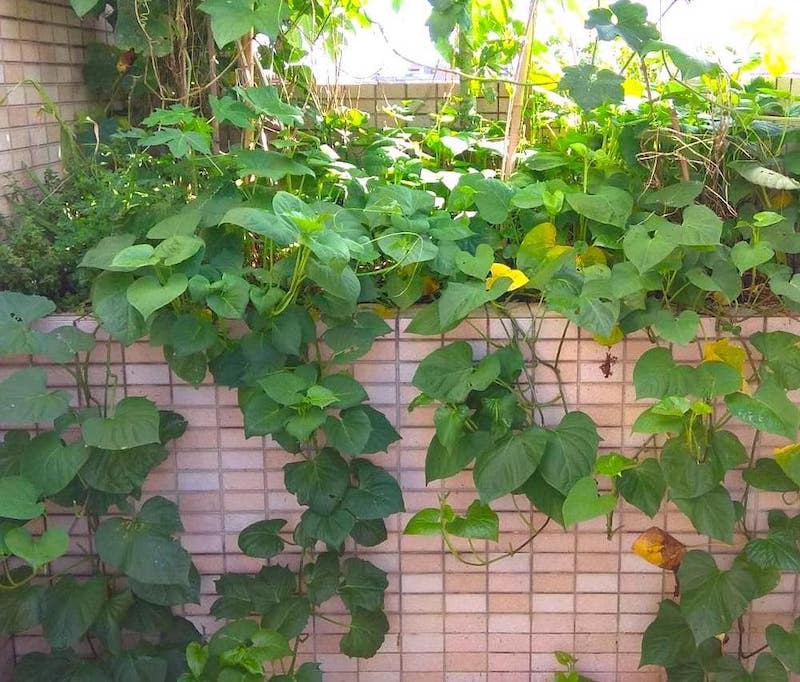
Sweet potatoes are invading our urban micro garden in Taiwan.
2. Hardy ginger
If you replant ginger bought in an organic store, you will have to take care to bring the planter inside in winter, or to protect it well with a plastic sheet for example. If you have purchased hardy ginger, it should withstand winter if it is well buried.
Each year in spring, young shoots grow out of the ginger rhizomes, develop, and dry out in the fall. You can then harvest the rhizomes and reseed some for the following year.
3. Perpetual leek
When your perpetual leek has good leaves like in the photo below, you can cut everything off at ground level and enjoy. If you leave the roots well in the ground, the leaves will come up again and again.
Towards the end of the summer, however, the leaves dry up. Don’t be afraid! If you do nothing, many leeks will grow back in the fall in the same place. If you open the soil, you will find many small bulbs that your leek has prepared. You can then replant them a little further apart to multiply your plants.

Our perpetual leek starts again in October, in Burgundy.
4. Cherry tomatoes
Tomatoes are not perennial plants, but they are great plants for beginners, because they produce lots of delicious fruit and their seeds can be resown very easily.
Cherry tomatoes are more interesting than other tomatoes, especially in a small area and when we are a beginner, because they produce over a longer period of time than other tomatoes, they ripen quickly, and in my experience, they are more resistant to diseases such as blight.
If you let the plant grow, it will tend to crawl on your balcony. You can also tie it to a stake to help it start upward. Last year, my cherry tomato plants grew over 2 meters tall!
The most common practice with tomatoes is to remove the suckers, which are the secondary stems that grow right above each leaf and produce much green biomass but few fruits. You can recycle these suckers by letting them dry and decompose on the soil of the planter. But I also invite you, if you prefer, to let these suckers express themselves as they want and to observe what happens…
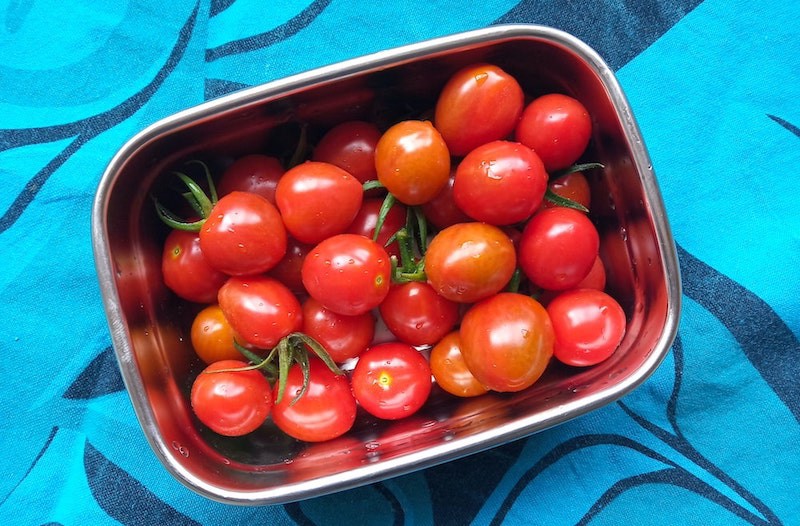
Our cherry tomato harvest from the roof of our building in Taiwan.
5. Basil
Any basil will do, such as those sold in small pots in supermarkets.
But if you find a peppery basil, with leaves that are a little sharper and a little darker, it will be more hardy. It’s a perennial in a tropical climate, so you can try to turn it into a sort of small shrub that you trim back as you harvest, year after year.
Every time you cut a basil stem, two stems grow in its place! And harvesting the flowers every now and then stimulates leaf production.
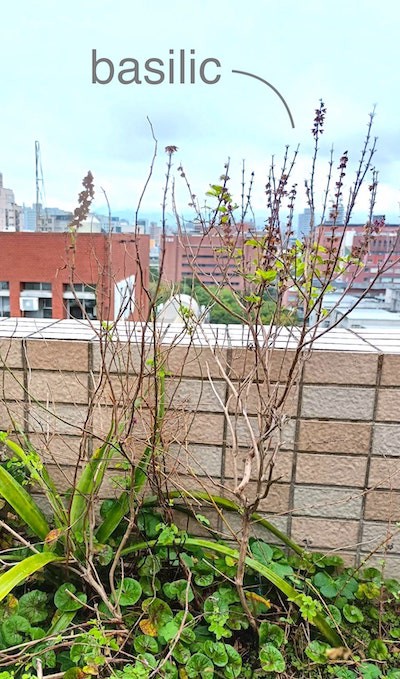
A 2-year-old basil plant continues its life, in an abandoned urban garden in Taiwan.
6. Kale
Kale has an elegant mini palm tree shape! The first leaves are quite large, then come the flowers which are also edible. In late summer and fall, new stems appear here and there, producing a multitude of leaves that are a little smaller than at first. You can harvest the leaves one by one and the flowers whenever you want, and enjoy. Kale is a biennial plant, but I try to make it last as long as possible to see what happens…
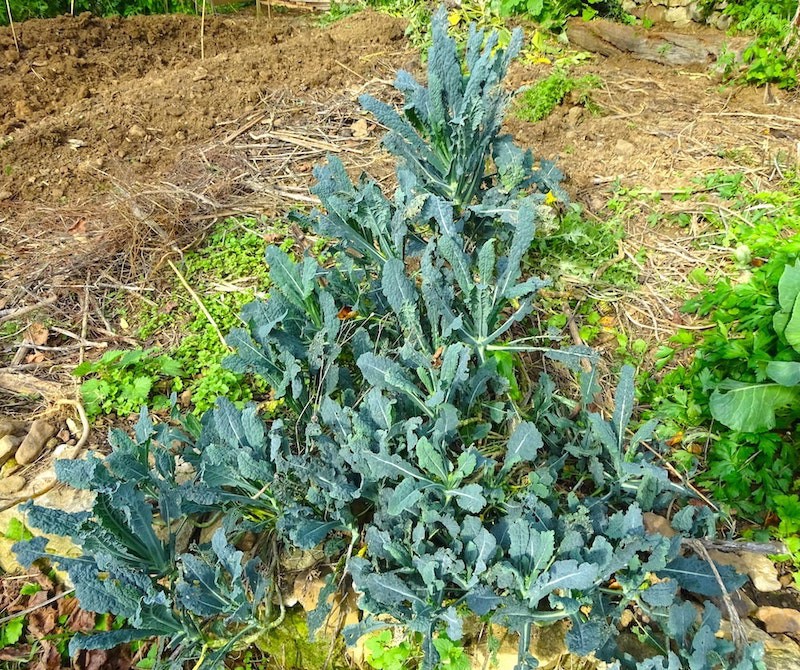
A one-and-a-half-year-old kale that keeps on growing, in Burgundy, France.
Multiply and offer everything you can!
One of the reasons I am offering this series of plants is that they are all easy to propagate!
There are several ways to propagate plants. The most common ways are by sowing seeds, replanting bulbs or tubers, and taking cuttings, which means replanting stems so that they form roots again.
Hardy ginger. Ginger can be propagated by harvesting the rhizomes in the fall and replanting them elsewhere.
Perpetual leek. Perpetual leeks can be propagated by harvesting the bulbs in late summer and replanting them elsewhere.
Sweet potato. Similarly, sweet potatoes can be propagated by harvesting the new tubers in the fall and replanting them elsewhere.
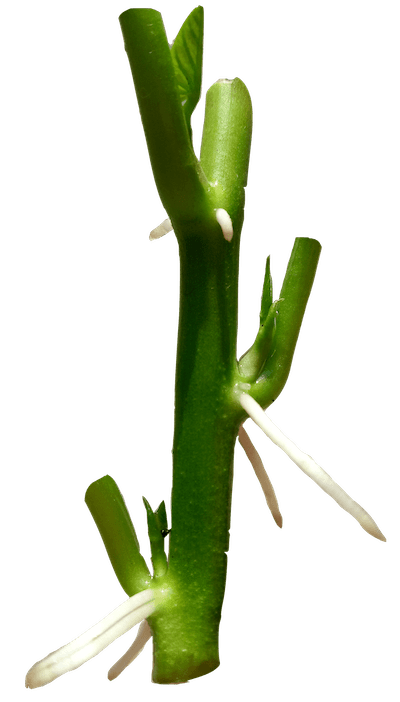
But we can also propagate sweet potato by cuttings, very very easily!
Cut a stem, remove the leaves, let the bottom of the stem soak in a glass of water, and roots will appear after a few days if the weather is warm enough, or after one or two weeks if it is cold.
This sweet potato cutting developed these new roots in just a few days!
Basil. Basil can easily be propagated by cuttings, just like sweet potatoes. But you can also harvest the seeds, save them, and sow them in the spring. If you’ve never sown a seed, this can be a good opportunity to learn.
Kale. You can harvest the seeds of kale and sow them the following year. In general, seeds from the cabbage family are easy to germinate. But you can also take cuttings from the stems. This time, you must put them into moist soil, because the stems tend to rot if they are directly in water.
Cherry tomatoes. You can propagate tomato stems by soaking cuttings in water, but you can also collect the seeds and easily germinate them the following spring! One of the many ways to prepare tomato seeds is to soak the seeds in water for 24 hours. Fermentation dissolves the gel surrounding the seeds, and after rinsing them, it becomes easier to handle and dry them.
With these 6 plants, you already have enough to learn the main ways to multiply plants. So, multiply, multiply, and offer these beautiful plants around you!
Did you like this article?
Great! Then, you may also like to read the next episode of this series, where I invite you to carefully observe your micro-ecosystem to better immerse into ecology, philosophy, and spirituality.
Lénaïc Pardon
I am a kind of researcher-explorer. I am French, introverted, and hypersensitive. I value a lot freedom, creativity, and altruism. I am curious about almost anything, but I do have a preference for topics around simple living: permaculture, nature, craftsmanship, autonomy, philosophy, the mysteries of life… More about me and my work >